Kamagra enthält Sildenafilcitrat als pharmakologisch aktiven Bestandteil. Dieser hemmt selektiv die Phosphodiesterase-5 und erhöht dadurch die Konzentration von cGMP im Corpus cavernosum. Der Effekt ist zeitlich begrenzt, da die Halbwertszeit von Sildenafil etwa vier Stunden beträgt. In der galenischen Form als Mundgel erfolgt die Resorption besonders rasch, was zu einem schnelleren Wirkeintritt führt. Der Abbau erfolgt überwiegend hepatisch über CYP3A4, wobei ein aktiver Metabolit entsteht, der zur Gesamtwirkung beiträgt. Typische Nebenwirkungen ergeben sich aus der Vasodilatation, darunter leichte Kopfschmerzen und nasale Kongestion. In klinischen Beschreibungen wird kamagra oral jelly im Zusammenhang mit der schnelleren Absorption erwähnt.
Winifred_shortcuts and tips
New and Improved Features, Shortcuts and Tips Keyboard Shortcuts
Drug Interactions Display F10 Fast Keys <Ctrl> + U <Alt> + C <Ctrl> + J <Alt> + L <Ctrl> + Q <Alt> + N <Ctrl> + T <Alt> + R <Ctrl> + N <Alt> + S <Ctrl> + <SHIFT> + - CPI print out <Alt> + U <Ctrl> + C <Alt> + A <Ctrl> + V <Alt> + D <Ctrl> + M
Safetynet <Alt> + X <Ctrl> + R <Alt> + F2 <Ctrl> + E <Alt> + F3 <Ctrl> + O <Ctrl> + I <Ctrl> + D <Ctrl> + F2 <Shift> + F6 <Ctrl> + F4 Date Function Keys
The Date Function Keys when used on a date field once or multiple times do the following; Page down SCRIPT SHORTCUTS AND TIPS Quick Scan View <CTRL + Q> When you view the recent scripts you have dispensed, deferred scripts have an asterix next to the drug name. The <Ctrl + Q> function marks items that are currently deferred. Mark Off Owing Scripts The Owing flag that shows to the right of the label in red will say Mark Off in black when you have Marked Off an Owing script. Dispensing of Repeats for Private Items The field to enter the last Dispense date has been removed and only the original script number and pharmacy approval number needs to be entered. Ctrl + R for dispensing Repeats When you need to dispense a Repeat you can press <CTRL + R> which allows you to enter either the Fast Repeat Code for the Repeat or the Original Script number. Fast Repeat Code Shortcut Consider the situation where a patient has a lot of different medications filled at your pharmacy and they return for you to fill their repeats. Their repeats have common numbers in their Fast Repeat Codes i.e. 12345A, 12345B, and 12345C.
You can dispense each of these by typing the relevant fast repeat codes. However in the above example after dispensing the first item using 12345A simply type [B and [C as the fast repeat code for the second and third items. The <[> character replaces the common number in the fast repeat codes.
Same Sigs In the directions field place <SS> which will bring up the same directions as used previously. See the Drug details box on right hand side of screen while dispensing Repatriation Authority prescriptions For items that are not on the RPBS list but are on an Authority prescription you will need to enter into the Rx Type field the letters <RA>. When you are at the Drug or Repeat No field type in the word <BLANK> and then <ENTER>. Choose the correct item and then you will have a spare line on which to type in the details of the item. SE and NR Sigs SE sig – expands on dispensing label to “Script Expires after DD/MM/YY” where DD/MM/YY is the prescription expiry date automatically inserted, based on the date of the prescription.
Similarly NR sig – expands to “Next Repeat available after DD/MM/YY”.
Fred Dispense will detect if the last repeat is being dispensed and remove the SE or NR sigs because they are not applicable when dispensing the last repeat.
Safety Net 20 Day Rule Winifred has multiple indicators to show when a script is affected by the Safety Net 20 Day Rule (SN20DR).
After selecting a drug that falls under the Safety Net 20 Day rule, the term “SN 20 Day Rule” will appear in blue in the Drug Details box on the right hand side of the Fred Dispense screen. After the pharmacists initials have been entered to complete the dispensing, “SN20DR” can also been seen in blue towards the bottom right hand side of the screen, above the claim serial number.
When a SN20DR script is dispensed within 20 clear days, the script becomes a Safety Net Consequence Script (SNQ). This means that the prescription will not count towards the patient’s Safety Net total or if the patient has already reached the Safety Net, the script will be re priced at the pre-entitlement safety net price. For example, a patient with a CN or Concession Safety Net Entitlement would find the script re-priced at the General PBS price.
In the circumstance where a patient has not yet reached the safety net limit, and a script is dispensed that is SNQ, the script will still appear on the patient’s safety net report. The script will be recorded with no safety net value and the term SN20DR will appear next to the safety net value column.
Indicators which show that a script is an SNQ item
When a drug is selected that will be a SNQ item, the standard immediate supply warning will appear to notify the user that the script being dispensed is within 20 clear days of another dispensing for the same item. The immediate supply warning will appear in red and the title at the top of the warning message box will read as “SN20DR Item”.
In the drug details box *SNQ* will appear to show that the item has safety net consequence. Once the pharmacists initials have been entered *SNQ* can also be seen towards the bottom right hand side of the screen, above the claim serial number.
In the patient history screen a hyphen or – can be seen on the right hand side next to the pharmacist initials. This flag also shows that the script is a SNQ script. Generic Substitution To substitute a drug for another brand during dispensing, (for example LOSEC substituted with ACIMAX) type in LOSEC at the drug description field and press Enter. When the list of LOSEC strengths is displayed, highlight the required item and press <F11> to display a list of substitutable brands.
Alternatively, once the drug has been selected and the focus has moved to the directions field press the <UP ARROW> to take the focus back to the drug description, then type <GS> and press the <ENTER> key. This will display a list of generically substitutable brands for selection.
A script can be also be generically substituted after the script has been dispensed. From the wait screen choose the <G>eneric Subst button. This will display a list of any generically substitutable brands for the item that has been dispensed. Once the brand substitution has been selected enter through the remainder of the edit script screen to return to the wait screen. From the wait screen you can reprint a <L>abel or <R>epeat or <B>oth Label and Repeat as required.
Please note that you will only be able to use these Generic Substitution Methods when there is a bioequivalent substitution available to be substituted.
PATIENT SHORTCUTS AND TIPS Improved Updating of Expiry or Valid To dates A single key shortcut can be used to allow for easier updating of a patient’s concession number “valid to” dates enabling only the year to be advanced in the expiry date field. This is very handy for updating Pension Card expiry dates because in most cases only the year changes.
Pressing the <]> key when sitting in the “valid to” date field will advance the date by one year. Alternatively, pressing the <[> key will change the year back one year. This feature is also available in the Health Fund “Valid To” date in the Patient Extra Information accessed via <CTRL+I> No Known Allergies Fred Dispense’s allergies list has been enhanced to include the option of No Known Allergies. This flag would be used when a patient replies ‘No’ to the question ‘Do have you any allergies?’ This provides differentiation between all other patients where no allergy conditions have been entered and is displayed as No Recorded Allergies/Conditions for patients who have not been asked. Notes in the Patient History field Notes can be added directly into the Patient’s History display to record interventions. A typical example of how this could be used is to document any contact you had with the prescriber about the patient and/or medication e.g. Change to form, strength, brand, dose etc. It can also be used to print out notes that you wish to give to the patient. • To access press <ALT+N> to give you the Patient History Notes entry screen. <TAB> key to move across to the options to Save, Print or Delete
• The Note now appears in the Patient History display and <F4> allows you to edit and print Recording of Pharmacist’s Interventions It is accessed in the same way by typing <ALT+N>. Press <TAB> to change the ‘type’ field from <N>otes to <I>nterventions. This then allows you to choose a class or type of intervention, a category and note the time taken. You can also produce patient intervention reports which are accessed via the Reports menu, Patient, Patient Interventions. Patient requests for Generic Brands Only. If a patient requests that they only want the Generic Brand, Fred Dispense can be set up so that if the more expensive brand with the Brand Price Premium is chosen, a notice appears asking if you wish to continue dispensing.
To activate this option for a patient, with the patient selected press <CTRL + I> to access the patient Extra Information screen. Place a Y in the field next to “Patient requests Generics Only?” and then press the <END> key to save. Automatic Receipt for an Individual Patient To automatically print receipts for certain script types with the patient selected press <CTRL + I> to access the patient Extra Information screen. In the field next to “Automatically Print which Receipts?” place an A to automatically print All receipts, an N for NHS only, or P for Private Only or leave the field blank to not automatically print any receipts. Improving Patient Selection A function has been added that allows you to highlight in red any patients for whom you regularly dispense. You can also change the display colour to grey for any patients who are deceased or not regular patients. This will be of use when you have many patients sharing the same surname. For example if you have 20 SMITHS on file but only dispense regularly to Mr. and Mrs. Michael Smith you can highlight their name in red, which makes them easier to find.
To change a patients status select the patient and press <CTRL + I> to access the patient Extra Information screen. By default a patient will have A for Active in the Status field. Changing this to a P for popular will mean the patient name will appear in red at the patient selection screen. U for unpopular or D for deceased will mean that the patient name will appear in grey at the patient selection screen. Ranking of Patients to Improve Patient Selection To automatically set the P for popular marker for easier selection of regular patients use the Patient List Ranked Report. This is found under the Reports Menu <ALT + R>, then <P>, then <R>. Choose the date range and the number of Patients you wish to report on. To place a P for popular in the status field for patients generated in this report, place a Y in the field for “Mark as Popular Patient?” Always Default Script Type to Private for an Individual Patient To always default to dispensing privately for a patient, select the patient, press <CTRL+I> to access the patient Extra Information screen. Place a Y into the field next to “Always Dispense Privately?”. This will mean that whenever this patient has a script dispensed the script type will default to P for private. You can also set a default private fee and mark up for the patient by placing the required fee and mark up category in the fields “Fee” and “Mark-up” found to the right of the “Always Dispense Privately” option. The numbers to be placed into the fee and markup fields correspond to the fee and mark up levels found in <ALT+S>etup, NHS <F>ees. Option to Auto Print Patient Receipts for Private Items only To activate the option to allow automatic printing of patient receipts, choose the Set Up menu <ALT + S> then choose Dispense options <D>. The “Auto Print Receipt for Private” option is on the bottom left of the screen. Change this to <Y> if you require this option turned on. Patient Invoices A Single Item Invoice shows the Nursing Home code. Patient Receipts For Script Items that require an Authority Number from the Medicare Australia, the Authority number prints on the Patient Single Item Receipt. Tax print outs To produce a tax print of a patient’s prescriptions for the last financial year - • <ALT><R><P><T> selects the PATIENT HISTORY REPORT screen.
• The last patient’s details from dispensing are shown
<ENTER> to choose the current patient or enter another patients name.
• If the patient is linked to a family you can include all family members.
• The previous Tax year is the default or you can press <C> for the current year. <ENTER> to Generate the report or <C> to Cancel. History search • Press <F2> to access the history for a patient up to 12 months old. Pressing <F2> accesses up to X months of most recent history for the selected patient. Where X equals the number of months set in the following Dispense Option, “Months patient History to Read”. The Dispense Option screen is accessed via <ALT+S>etup, <D>ispense Options. The majority of sites have this set to 12 months. Press <CTRL + F2> to access the entire patient’s history. Pressing <CTRL+F2> accesses the complete Fred Dispense history for the selected patient. It ignores the X setting which is set in the Dispense Option “Months patient History to Read”. In other words the patient’s whole history for prescriptions dispensed in Fred Dispense is displayed irrespective of date dispensed. The alternate view of history <Alt+F2> displays the patient price at the start of the directions field. Pressing <ALT+F2> accesses an alternate view of the patient history. This alternate history view displays the prescription date, in addition to the date of supply. The pharmacists initials displayed this view are the initials of the pharmacist who originally dispensed the prescription. The script type is also displayed in the Alternate view. This can include Private Price Code where applicable. For example if you dispense a private item and cost it using the Table of Fees and Mark Ups, it will display in the alternate history using the codes from the table ie. P33. This enables you to check the Fee and Mark Up used for that dispensing without editing the script. Press <F9> to access your old computer system history. The majority of conversions from other dispense systems to Fred Dispense convert the data as active history. This means that the scripts that are converted can be edited. Therefore the F9 function will very rarely be necessary. History Display of Owing Only Items Using <ALT+F3> filters the patient history to only display owing prescriptions in the patient’s history. Pressing the <ENTER> key from this screen quickly starts off the owing mark-off process which otherwise would be performed at the wait screen. Unusual Patient Searches When you have finished dispensing for a patient and return to the field to search for the next Patient Name, there are a few shortcuts that can be used to search for the next patient. • Press <F> to show any other Patients linked in the family <S> to access the Same patient <P> to show the Previous patient <N> to show patients with the same Surname Patient Search By Address This is a useful search when the doctor’s writing is difficult to read and you do not know the patient’s name but can make out the address on the prescription.
The two simple ways of searching this way are; •
Using comma comma and the address ie. ,,<address>
Using minus and the address ie. -<address>
Patient Search Filtered by Nursing Home Pharmacies who deal with multiple Nursing Homes or Hospitals can narrow down their patient searches to only search for patients from a particular Nursing Home or Hospital. Imagine one of the Nursing Homes that we have set up in Fred Dispense as “Example Nursing Home” and its fast code is “EX”. There is a patient with the surname “SMITH” in Example Nursing Home. To filter the patient search by Example Nursing Home only; •
Type the equal sign then the nursing home fast code ie. =EX <ENTER> at the Patient Name or Repeat No.
Only patients in the Example Nursing Home are searched for when typing in the patient surname after the filter is turned on. Typing SMITH at this point will only select the SMITH who is in Example Nursing Home.
Alternatively, typing the equal sign ie = <ENTER> at the Patient Name or Repeat No will bring up a list of all the available Nursing Homes to allow choice of which Nursing Home Hospital that we want to filter the Patient Search by. The Nursing Home is selected by use of the arrow keys or by beginning to type the Nursing Home’s name in the list. NB: Pressing <ESC> key from this screen will turn off the filter. Patient Profile Screen This function displays the patient history as a summary of the medications dispensed. It is accessed via <CTRL+F4> keystroke combination and displays each drug dispensed and includes directions, the date the treatment commenced, number of times dispensed, number of repeats remaining and displays “owe” if a prescription is owed for that particular drug.
Highlighting each item in the patient profile displays all the actual dispense dates in the grey help area at the bottom of the screen. The patient profile can be printed by pressing <F11> to display the patient profile report to the screen which in turn can then be printed in the usual manner. You can also choose the amount of history that you want to report on via <ALT+F4> which will allow filtering from a certain date. This is particularly useful when there is a large amount of patient history but you only require displaying the last six months only.
When you have the Patient Profile on the screen, press the <F11> key and then the <ENTER> key twice to print. You can also choose the amount of history you wish to report on by pressing the <ALT> key and the <F4> key together. This is useful when you have a large amount of the Patient’s history but want to display the last 6 months only. Family Indicator When completing a Safety Net application form it is necessary to list the relationship between the applicant and each member of the family. This relationship can be pre-recorded in Fred Dispense. This feature is accessed via <F8> for the Patient Details and the relationship code is entered into the Family Ind field.
The relationship codes are: <H>ead <S>pouse Dependant <C>hild <D>ependant Student
When the family reaches the safety net limit and the application form is printed the relationships will be included and will not need to be recorded manually.
DOCTOR SHORTCUTS AND TIPS Fast Doctor Selection At the Doctor field during dispensing press <ALT>, <DOWN ARROW > or click on the drop down arrow to access a list of previously used prescriber numbers. With the doctor highlighted press <ENTER> to select the doctor. See example below of Doctor drop down list. Doctor’s Name included on Multi-Item Receipts The Doctor’s name is included with each item dispensed on a Multi-Item Receipt. Stolen Script Pad Warning When you mark a doctor as having a stolen script pad the warning will appear when you first dispense using that doctor for each new patient. Printing a single Doctor’s Address label To print a Doctor’s Address Label, first access the List of Doctors in the List’s menu press <ALT+L> then <O>. Search for the required doctor then choose <P> to print. You are given the option to print an Address Label or a Report of Doctors in your system. Mailing Labels for Doctors As part of the Nursing Home Owing Script reporting, Fred Dispense automatically builds a list of doctors found in the report to simplify printing of address labels. The production of address labels is accessed from the Activities menu, Mailing Labels. From here, type D to produce Doctor Mailing Labels. Please note mailing labels can be printed out on script labels or mailing stationery labels.
It is important to note that Mailing Labels will not be produced for owing prescriptions where the prescriber is a Causal Doctor. They MUST be in the Doctor’s file within Fred Dispense.
DRUG SHORTCUTS AND TIPS Fast User Defined Codes for Finding Drugs The ability for you to define a fast code for a particular drug has been added. By accessing the drug in the Drug List (ALT+L) and D for Drugs. Update the drug you want and add your fast code to the drug. E.g. Ventolin Inhaler you may use the code simply as V or VI in the User Drug Code Field. Save the change to the drug file. Repeat this for any drug you wish to find in this way.
When dispensing and on the drug name field you simply need to prefix your code with a semi-colon and your code e.g. ;V or ;VI and your drug will be chosen. This feature can be very helpful for finding and selecting very common drugs using codes you can remember.
User defined codes can also be used for Own Brand Drugs. To access press (ALT + L), then B for Own <B>rand Drugs.
Setting PDE Numbers For Products Not From Your Main Supplier • <ALT><L><D> selects the DRUG FILE. <ENTER> to bring up the Search box.
Enter the name of the drug then <ENTER>
Select the drug then <U> for Update.
Move to SUPPLIER CODE and type in <OWN>
Move to PDE field and enter the required code.
<END> saves. Highlighting Drug Brand or Pack Size for Easier Dispensing When you have a choice of brands or pack sizes you can highlight the one you use most often so there is less error in dispensing. • Press <ALT+L> to access the pull down LISTS menu <D> for Drugs <S> or <ENTER> to search for the item you require <U> for update
Move to the field marked Drug Ranking, insert the number 1 which corresponds to ‘Used most often’ <END> to save and this item will now be highlighted in red when you search for the item during
There is also a program within Fred Dispense that can automatically rank your most commonly used drugs for better selection. Press <ALT+R><U><R> to run this report. Quick Price Look Up The Government Recovery Price has been added to the Quick Price Look Up function, accessed by <F7>, so you can quickly see what proportion of the cost the Government covers. Drug Selection After choosing a drug if you have chosen the wrong strength e.g. Amoxil Caps 250mg instead of 500mg you can arrow back up to the drug field and type “S” for same drug & form and show the different strength. Similarly typing “D” will show the same drug (all strengths and forms) as previously selected. How to Fix Drug Prices for Private and Schedule 3 Recordable Items For Private items or scripts that can be dispensed as Schedule 3 recordable drugs you may wish to enter your own price rather than use the Guild recommended price. To do this you need to access the pull down “LISTS” menu by pressing <ALT + L>. Then press <D> for “Drugs”. Press <S> for Search and search for the item you require e.g. Mersyndol. Once the Drug has been chosen and appears on the screen press <U> for Update. The cursor appears on the screen at the field “Disp fee” and you can move to where the field “Private price” or “Schedule 3R” is and enter the price you wish to charge. This is a set price and it will need to be reviewed regularly, as it won’t change with any wholesale price changes. Displaying the Drug Cost The Drug Information box, which appears while dispensing to the right of the screen, can be set to display the cost of the drug. This information can be displayed on All screens, the Main machine only, the Terminal only or Not at all. Go to the Dispense Options (<ALT+S> then <D>) and change the field ‘Display Drug Cost/Retail’ as appropriate. Own Warnings on Drugs Fred Dispense has been enhanced to allow pharmacists to place a limited number of their “own” warnings on drugs in Fred Dispense. If a warning has been placed on a drug it will appear in the bottom left hand corner of the dispensing screen when the drug is dispensed. Please note that five warnings only can be displayed. If you try adding a sixth the warning will NOT be seen e.g. If you try to add a warning to Tetrex Caps it will not be seen). If you want this warning to be printed out on the dispensing label add an appropriate own SIG in the Sig Details screen which is accessed via the Lists menu <ALT+L>, <S>ig Details. Then add the Warning via the Drug Warnings screen accessed via the Lists menu <ALT+L>, Drug <W>arnings. Once in the Drug Warnings screen pressing <A>dd will allow a user Warning Code, Description of warning and the appropriate SIG if applicable to be entered. The final step is adding the warning to the drug. This is done via Drug Update screen accessed via the Lists menu <ALT+L>, <D>rugs.
At the Drug update screen search for the appropriate drug and when selected press U to update then <TAB> down to the Own Warns field and add the Warning Code as entered in the Drug Warning Screen.
See example below of what how an Own warning will appear on the dispensing screen
Variable Private Mark Ups based on Wholesale Price Fred Dispense allows pharmacists to set varying private mark ups based on wholesale cost of the drug. This can be achieved by entering the Private Fees and Markups screen accessed via the Setup menu, private Fees menu option.
The top left hand box has a heading “Default Private Fee(0) & Markup(0) based on W/Sale Cost Ranges”. When first entering this screen your normal default private markup and fee will be displayed for a wholesale cost range of $0.00 to <$9999.99. If left like this, the default fee and markup will apply for all private prescriptions except the ones that have specific price, or a non-default category or markup category set by you. If you want to set variable markup ranges simply overtype the 9999.99 with the upper wholesale cost limit that you want for this particular range then apply a fee and markup that you want for this range. This can be repeated to define up to 4 price ranges with individual markup and fee structures based on wholesale cost. If not requiring four ranges simply type 9999.99 at the end of the last range required. This pricing structure will not apply to drugs that have had their prices set in the Lists, Drugs menu i.e. if the drug’s private price field has a set price or the Fee Cat and Markup Cat fields have any number apart from the default (0).
The top right hand box within the Private Fees and mark Ups screen has a heading “Fee and Mark Up Override Table”. This table enables nine different fees and mark up percentages to be predefined and utilized when needed.
The list of fees and mark ups shown in this table can be used in several ways;
When the price field is accessed in dispensing for Non-NHS item, this table displays. The price can then be overtyped with a listed price or <TAB> will allow the number next to the required fee to be entered then the required mark up to be entered. The price made up from the base wholesale (shown in table) with this fee and markup will be used. It is not necessary to match the fee and markup numbers e.g. Fee 3 and Mark Up 6 can be chosen or any other combination.
In the DRUG list, any of these fees and mark ups can be inserted in to the fee and/or mark up field for that drug. From then on, when that drug is chosen for a private dispensing in dispense, the fee and mark up set will be used instead of the defaults.
When dispensing, if a given fee and mark up are to be applied, they can be added to the Rx type field. For example, I want Colofac Tablets to be priced for a patient at Fee 4 and Mark Up 4. By going to the Rx Type field and putting in P44, Fee 4 and Mark Up 4 will be applied to the wholesale price. Alternatively, the actual dispense price can be overridden on an individual script basis by tabbing to the price field and overtyping and dispense price that is desired. Fred Dispense will automatically add the V suffix and change the Rx Type to PV which indicates Private Override price.
Most users are familiar with other common Rx Type suffixes such as O for PO to indicate an owing private prescription and A for RA to indicate Authority Repat prescription for non-scheduled V99F type items. There are also private Rx Types that can include the suffixes <C> for Price OTC, <W> for Price Wholesale, and numbers 1-9 for overriding the default price on private lines. <M> can be used to not apply a wastage charge on broken packs. Numbers 1-9 refer to the “Mark Up Fee and Override Table” settings.
NOTE: OTC price must be set up for individual drug (if required) before it is available as an option.
How can I find which drugs have a set price in my drug file? A drug listing report can be accessed via the Lists menu, Drugs, and by clicking on the Print Button. These drugs can be chosen in any alphabet range and can be filtered to only report drugs that have Private Prices set, OTC prices set or Fees/Mark Ups set that are different from the default fees and mark-ups. This enables you to readily review any individual fees and mark-ups that you have set. FUNCTIONS OF THE <F11> key
Generic Searching Made Easier The <F11> key can be used to help search for the generic Brands that are available for an item. To use this function -
• First search for an item e.g. TENO for Tenormin tablets and highlight Tenormin Tab 50mg in the Drug
• If you now press the <F11> key you will get a display of all the Brands of Atenolol Tablets 50mg to then
Note: This function can only be used within the Drug Selection screen
If you have chosen the drug and are now at the direction’s field press the up arrow as before and type the letter <G> to obtain a list of all Brands available. Quick Script Copy Feature To quickly copy a previous dispensing, highlight that item in the patient’s history and press the function key <F11>. This copies the dispensing and allows you to change dates, quantities, directions etc as needed. This is not a repeat dispensing but a new dispensing. Quick Copy of Patients Details Adding a different family member quickly can also be done using the function key <F11>. Search for one family member and highlight their name in the Patient Selection screen. Press the <F11> key to copy the address details for the new family member. To access the Repeat Field Quickly When editing a prescription and you need to only change the values in the Repeat Field e.g. when marking off owing scripts, press the <F11> key when you are on the Script Date Field to move the cursor directly to the Repeat Field. To turn the Brand Name or Generic Name on and off the label quickly If you do/don’t wish the Brand or the Generic Name to appear on a Single Label, press the <F11> key to turn on/off the second name. CLAIMING SHORTCUTS AND TIPS How to access the Pharmpay Claim menu This can be done by pressing the <ALT+C> keys to go directly to the correct section in the Activities menu. Script/Claim number display function in Pharmpay Claim Menu When checking for scripts missing from the current claim access the Pharmpay Claim Menu by pressing <ALT+C> then press <S> for Script/Claim Number display. When you have viewed one item the Grey cursor bar remains at the Serial number field. To search for another item just type in the next Serial number; there is no need to press the escape key.
See example below of the Script/Claim Number Display Screen
Placing Multiple Scripts on Hold made easier Consider the scenario where you are about to finalize your claim and as usual there are about 10 prescriptions from that claim still uncollected. Previously, the scripts were placed on hold by editing them individually. The process has been simplified further so numerous scripts can be placed on hold in a batch rather than individual editing. This has been achieved with the introduction of the H<o>LD Claim Numbers screen which is access via the Pharmpay Claim menu. <ALT+C>, H<O>LD Claim Numbers. The screen is similar to the Script Claim Number display where you type in the Serial Number then <ENTER>. Fred Dispense will then ask you “Sure you wish to Hold Claim ‘R9’? <Y>es<N>o. Once this is answered the next Serial Number can be entered and so on. Claim Validation Report It is highly recommended that he Claim Validation reports are generated regularly throughout the month and immediately prior to finalizing claims to highlight problem prescriptions and eliminate the possibility of prescriptions being rejected for payment by Medicare Australia. This report is particularly useful if dispensing a lot of prescriptions with the “<D>ispense as NHS now, enter Medicare details later” option, where it would be very easy for prescriptions to be submitted for payment without Medicare details. If you run the report frequently you can fix up prescriptions as the claim is building rather than having to try and fix up all the problem scripts at the time of claim generation. Claim Processing Tip Many pharmacies generate and finalize their claims and then elect not to create a claim disk immediately when prompted. It is important to note, if you do edit any prescriptions that are in a previously closed claim (such as reclaiming in the current claim, placing a script on hold, etc.) the changes will not be reflected in the previously closed claim until the old claim is Generated again via <ALT +C>laim, <G>enerate Claim file. It is important to note, if you do make changes to items in a previously closed claim and need to produce a disk, you should use Generate Claim File. REPORTING SHORTCUTS AND TIPS Wholesale and Set Private Price on Drug Listing Reports When you print a Drug List from either the Main Drug List or your Own Brand Drug List, it will print both the Wholesale and the Private Set Price that is included in the system. To access the Main Drug file press <ALT + L> then <D>. For Own Brand Drugs press <ALT + L> and <B>. Choose to Print and then if required set the Option to print only those with Private Set Prices. Mailing Category functions Top Customers There is a process included in the Patient List Ranked Report to assign your Top Customers a Mail Category that can then be used for marketing purposes.
To access the report, press <ALT + R> for the Reports Menu, choose <P> for Patients and then <R> for the Patient List Ranked Report.
Choose All patients, Nursing home patients or Non Nursing home patients, a date range, the number of customers needed and the category you wish to assign.
When you generate the report it automatically places the Category in the Patient’s Detail screen so you can then print labels using the Mailing Labels Function. This function is found under the Activities Menu <ALT + A>. This is also where you can remove Mail Categories as the maximum categories allowed for any patient is four.
Other Optional Criteria e.g. Birth date, Suburb, Safety Net numbers Go to the “Activities” menu <ALT+A> then the “Mailing Labels” menu <A>. Choose “R” for a report, “F” to export to a file on the computer or “P” to print labels directly. In the “Optional Criteria” section, type one of the commands listed below
Then use the ENTER key to generate the report.
To list patients who have reached Safety Net entitlement and Safety Net concession (NOT EMPTY(PSAFENTNO)) OR (PCONCTYPE = “S”)
To list patients who have reached Safety Net entitlement only NOT EMPTY(PSAFENTNO)
To list patients who have reached Safety Net concession only (PCONCTYPE = “S”)
To list patients by postcode PPOSTCODE=XXXX where XXXX is the required postcode
To list patients by birth date for a given month MONTH(PBIRTHDATE)=X will list all patients with a birth date in the month corresponding to the number e.g. 1 = January, 2 = February etc
To list patients by birth date who are of a certain age (DATE()-PBIRTHDATE)<XXXX will list all patients who have a birth date which is less than XXXX where XXXX is the number of days e.g. 3650 corresponds with 10 years of age How to view the Last Report Generated To quickly view the Last Report Generated press <CTRL+V> You can also print this by pressing <ENTER> then <Y> Patient List by Drug When you run a Patient List by Drug report, the report can now be displayed in either patient, doctor or date order. If you are searching for those patients who have been dispensed a blank item, the description of the blank item now appears in the report. Monthly Drug Usage for a Single Drug <Alt+U> is a fast key to move quickly to the Drug Selection field of the Monthly Drug Usage Report for selection of a single drug. After selecting the drug press the <END> key to generate the report. Owing Scripts Reports There are 2 places in Fred Dispense where you can access owing script reports via the Reports menu <ALT+R>, <S>cript, <O>wing Scripts <ALT+R>, <N>ursing Home, <O>wing Rx
The option to choose <A>ll patients, Nursing <H>ome patients or N<O>n Nursing Home patients by choosing A, H or O.
The option to order report by Patient or Doctor and, if desired, us e a separate page per doctor.
Allow you to place any date range that you want the report to cover.
The feature of ordering a report by Dispense Date is only available in the owing prescription report that is accessed via the scripts menu.
It is recommended that you use the reports outlined in the Nursing Home Menu irrespective of whether or not the patients you are reporting on, reside in a Nursing Home. They are more flexible and provide more options for how the report is presented. They also allow the patient’s Medicare number to be displayed. Even though the recommended report is under the Nursing Home sub-heading, it can still apply to all patients by choosing the <A>ll patients option rather than Nursing <H> or N<O>n Nursing Home.
Other benefits of using the Nursing Home Owing Rx Report is that it orders the report correctly by Doctor Surname. It also offers the ability to include directions and/or number of repeats, or filters for authority only items or particular patients within a certain mail category. Owing Scripts for a single Doctor can be reported, but you must use doctors stored in the doctor’s file, and not casual doctors.
Required Scripts Report An extension of the owing script report is the Required Scripts Report, which can be accessed via the Reports menu, Nursing Home, Required Rx Reports. The Required Scripts Report will include owing items as per the Nursing Home Owing Rx reports as well as any other items, which the last dispensing has been done for.
If this report is generated for a date range that is shorter than 21 days, the report will also include a list of any owing scripts from the previous 6 months
If your pharmacy dispenses a short term drug (ie. Antibiotic) as either an original item with no repeats or as a final repeat, it would be unlikely for the pharmacy to want this drug to be reported in the required Scripts Reports. To stop it being reported place a #X in the directions which will prevent it from being reported in the Required Scripts Report.
Doctor Owing Script Reports When you print a Doctors Owing Scripts Report (<ALT+R> then <D> then <O>) and choose to report by doctor, the Doctors address now appears on the report. Doctor History Report The Doctor History Report can be accessed via the Reports Menu, Doctor, Doctor History. It has been enhanced to provide an option to Only Show original Scripts Y/N. The default option of N will display prescriptions as per normal whereas Y will filter the Doctor History Report to only display Original Scripts only. It is important to note that any repeats dispensed from the original prescriptions dispensed at other pharmacies will not be seen in the report if the option is set to Y. Nursing Home Owing Script Reports When printing the Nursing Home Owing Scripts Report (<ALT+R> then <N> then <O>) there is an option to print the directions on the report as well. Change the field ‘Include Directions?’ from N to Y Ranked Doctors Report The report to list your Doctors by the number of scripts that you have dispensed for them (<ALT+R> then <D> then <R>) has now been enhanced to list the Doctors by the number of owing scripts. Change the field ‘Owing Scripts Only?’ to Y Daily Script Totals Breakdown This report allows you to view at a glance the Daily Total Amounts of all the scripts dispensed at your pharmacy. The report is broken down into Patient Contributions, Government Recovery Value, Totals and the Average of the value of scripts over the given period. To access the report, choose <ALT+R> then <S> then <D> for the Daily Totals Breakdown Report. You can Report on all scripts dispensed or narrow down the search to only include nursing home scripts and set a date range similar to other Fred Dispense reports. Workload Statistics Report The Workload Statistic Report now includes an average of all the different time divisions (over a given period of time) at the bottom of the report and allows for up to 50 pharmacists. Nursing Home Owing Script reports An option has been added to the Nursing Home Owing Scripts report so that you can include on the report the number of repeats. This will only display the number of repeats that you have entered not the NHS maximum number of repeats. To access the report press <ALT + R>, <N> then <O>. Change the field Include ‘Rpts?’ From N to Y before generating the report. Note: The Nursing Home Owing Script Report can be used to report on Non Nursing Home Patients also. Choose <A> for All patients or <O> for Non Nursing Home Patients Tax Printouts, Patient History Reports and Privacy Fred Dispense has been enhanced to enable the drug description to be hidden from Patient Tax Print, Patient History and Patient History by Address reports. This is achieved in various reports by answering Drug Descriptions? N. The resultant reports will print with the Drug Name as <Drug Description Hidden> PRINTING SHORTCUTS AND TIPS Consumer Product Information Leaflets To print CPI’s either: -
Immediately after selecting the drug, access the Activities Menu <ALT+A> then choose CPI print <I> or the short
cut keys <CTRL+SHIFT+ - >. The CPI will appear on the screen. Press <ENTER> for the option to print, or the down arrow key to move through the CPI a page at a time. You cannot scroll back.
• Continue dispensing and when you reach the ‘WAIT’ screen choose Drug Information <I> to print the CPI. • To print a CMI without having a patient selected, go to <F7> Price look up, select the required drug and press
• To be prompted to print a CMI when there is a new drug or a drug that has not been dispensed for a set number
of months you can enable a feature in the Dispense Options screen. Go to <ALT+S>etup, <D>ispense Options. At the question “Prompt for CMI when new or old drug” enter the number of months that need to pass between dispensings before a prompt to print a CMI is required and enter <A>ll patients, Nursing <H>omes or N<o>n Nursing Home Patients to filter which types of patients this option applies to. To disable this feature enter 0 as the number of months that need to pass between dispensings. FRED 5 style labels FRED 5 labels were developed to enable the printing of directions on a thinner label to be put on eye drop bottles and other small bottles. Another special function of the FRED 5 labels is that you can print a sticker saying IMMEDIATE SUPPLY NECESSARY to place on scripts where you have supplied the item within the past 4 or 20 days.
Standard size main dispensing label for the maximum amount of directions. This is the same size as Foundation 4, Chemdata 6 & 7 but the amount of copy (your name details) is restricted.
2. Bottom
This is usually the duplicate label for the repeat form. It is a larger size and can be set up to print 2 or 4 lines of duplicate details depending on your use. This label's major feature is to allow drugs with small bottles, E.g. Eye drops or Primolut N, which are flagged in the drug file to also print on the small label. This is why the bottom label has Keep Out Of Reach Of Children on it. This eliminates the need to chop the larger label for small items. The larger label also prints as usual and this can be placed on the outer box if desired. In this scenario the duplicate details are printed on the upper right label. Top Left Label This is for the Safety Net Card details, but also when you override a 4/20 day warning, the label can be set to be printed with “Immediate Supply Necessary” for you to attach to the script and sign. Top Right Label This label normally prints the patient’s entitlement/concession number. This is fantastic to stick on the repeat forms or the original script especially at the change over safety net periods. This eliminates hand writing the patients concession number on scripts. This label has your name and NHS approval so it can be used for small bottle labels. E.g. Eye drops.
One option for a small duplicate label is that you can use the top right label always for your repeats duplicate sticker if you don’t like the larger duplicate label.
The drug list has items that present in small containers e.g. Lasix, Primolut and many eye drops marked as such allowing FRED to automatically print the small label. If you want to add or change any of these settings, you can do so on each individual drug.
The Fred 5 label The ‘FRED 5’ label is currently available through Fildes nationally and Sterling Agencies. Contact your label representative for further details.
1. Normal Label
Immediate Supply Item 4 Lines Duplicate “ON” Concession Number “ON”
2. Small Bottle Item Drug Label. Alternating between printing “Immediate Supply Necessary” and printing the PRF Details Pressing <CTRL +P> at the wait screen allows the user to alternate between printing “Immediate Supply Necessary” or printing the PRF details printed on the top left label Webster System Labels Webster System Labels have been altered to include the Nursing Home Code, which appears before the Room Number. How not to print labels In the Directions field place the letter <Z> at the start of the directions this prevents a label being printed. Press the <Page up> key to quickly move you to the start of the directions. Brand and Generic Names on the Label To enable both the Generic and Brand Names to print on the dispensing label you need to change one of the Label Configuration options. Access the Set Up menu <ALT + S>, then Dispense Options <D> and click on the label printer tab. Change the sixth option down on the left hand side, ‘Generic/Brand Printing’ to Yes <Y>. STOCK VALUATION HELPER To help with the end of the financial year Stocktake of the dispensary you can use the Stock Valuation Helper. It allows you to value the dispensary stock on hand using the wholesale prices in the Fred Dispense program. It is intended for use by those who don’t have a POS system or who Stocktake their dispensary manually.
The Helper produces a print out of the dispensary stock items used over the past 12 months. You can then count the items currently on hand and enter them in to the computer. A report is then printed which includes the item description, wholesale price, quantity, value and total value.
NOTE: This is NOT a stock control system but a program designed to help you quickly do stock valuations of the dispensary at the end of the financial year.
Access the Stock Valuation Helper via the Activities menu, Stock Valuation option.
Initialize Stock List – This process builds the Stock List of drugs from the last 12 months of scripts. Print Stock Sheets – Stock Sheets for ranges of the alphabet are printed to help manually record the Item counts from the shelves. Enter Stock Counts – The cursor appears on the “Packs” column to enter the quantity counted and <ENTER> moves down to the next drug. To quickly locate a different drug press <S> for Search and begin typing the required drug name, <ENTER> selects the drug and moves to the “Packs” field. If required, by pressing <TAB> you can modify the Wholesale price. Drugs can be added or deleted from the Stock List via <INS> and <DEL>. Items not found in the drug file can be entered via “BLANK” which will allow the description and Wholesale price to be entered. If you need to return to Dispense press <ESC> to exit. The drug entry you were up to is remembered, so when returning to ‘Enter Stock Counts’, you are returned to exactly where you left off. Stock Valuation Report – This report only includes items that have a ‘Packs’ amount entry. Exit to Dispense - <ESC> or <X> also exits back to Dispense.
Support Hours Mon – Fri 8.30am - 9.00pm (EST) Sat, Sun & Public Holidays 8.30am - 5.00pm (EST) www.fredhealth.com.au
Pioglitazone (Actos) for type 2 diabetes mellitus (pie–oh–GLI–tah–zone) The TGA advise that long-term use of pioglitazone may increase the risk of bladder cancer. See the August 2011 In Brief. Pioglitazone improves glycaemic control but it is unclear whether it improves diabetes-relatedclinical complications and mortality. Prescribers should consider this — along with recentlyemer
Controlled Ovarian Hyperstimulation Changes the Prevalence ofSerum Autoantibodies in In Vitro Fertilization PatientsKadri Haller1,2, Aili Sarapik1, Ija Talja1, Andres Salumets2,3,4, Raivo Uibo11Department of Immunology, Institute of General and Molecular Pathology, Centre of Molecular and Clinical Medicine, University of Tartu, Tartu,Estonia;2Department of Obstetrics and Gynecology, University o

 New and Improved Features, Shortcuts and Tips
  SCRIPT SHORTCUTS AND TIPS
  Safety Net 20 Day Rule
  PATIENT SHORTCUTS AND TIPS
  Ranking of Patients to Improve Patient Selection
  Press <F9> to access your old computer system history.
 Family Indicator
  DRUG SHORTCUTS AND TIPS
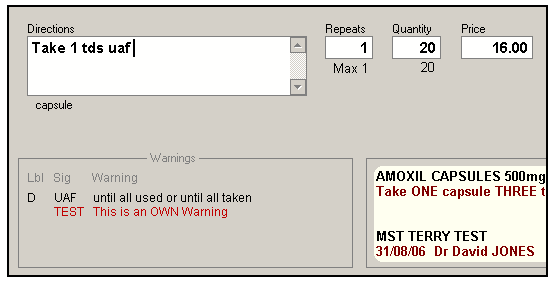
 Displaying the Drug Cost
  Variable Private Mark Ups based on Wholesale Price
  FUNCTIONS OF THE <F11> key
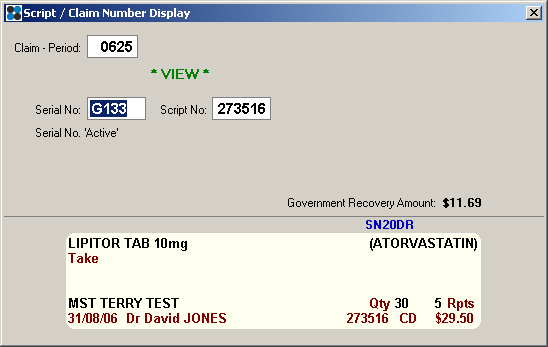
 CLAIMING SHORTCUTS AND TIPS
  REPORTING SHORTCUTS AND TIPS
  Monthly Drug Usage for a Single Drug
  Doctor Owing Script Reports
  PRINTING SHORTCUTS AND TIPS
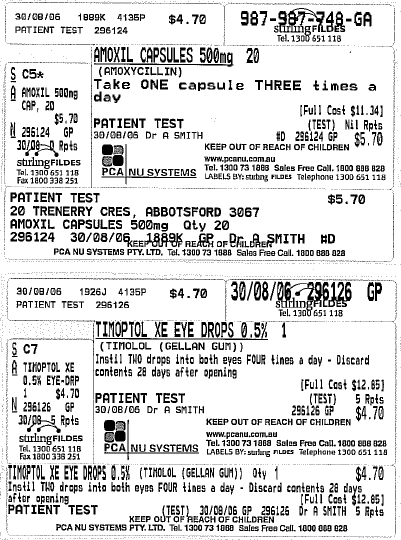
 The Fred 5 label
 STOCK VALUATION HELPER